Have you ever seen someone with glowing, fresh-looking skin and wondered how they got that beautiful shine? The secret might be a makeup product called highlighter. It is a popular beauty product that adds a soft glow to the face and makes certain features stand out. When you apply it in the right places, your skin can look brighter, healthier, and more radiant without using too much makeup.
But where do you put highlighter on the face, and how do you apply it correctly? If you are new to makeup, you do not need to worry. Applying highlighter is easier than it looks, and you do not need expensive products or professional skills to get started.
In this guide, you will learn the best places to apply face highlighter, how to choose the right formula, and how to create a natural glow for everyday makeup. You will also discover common mistakes to avoid so your makeup looks smooth and beautiful.
What Is a Face Highlighter?
A face highlighter is a makeup product that reflects light and gives your skin a glowing appearance. It usually comes in powder, cream, or liquid form. Depending on the product, it can create anything from a soft, natural shine to a bright, sparkling finish.
Think of highlighter as a little bit of sunshine for your face. Just as sunlight makes certain parts of your face look brighter, highlighter helps bring attention to the areas where you apply it. It is often used with foundation, concealer, blush, and bronzer to complete a makeup look.
Highlighter is different from foundation because it does not usually cover the whole face. Instead, you apply small amounts to selected areas. These areas naturally catch light, making your makeup look more dimensional rather than flat.
You can wear highlighter for many occasions, including school events, family gatherings, parties, weddings, and everyday activities. For a simple daytime look, choose a soft glow that blends into your skin. For an evening event, you can use a brighter finish if you like a more noticeable effect.
Remember, the goal is not to cover your face in shimmer. The goal is to add light where it looks most flattering.
Where to Apply Highlighter on Your Face
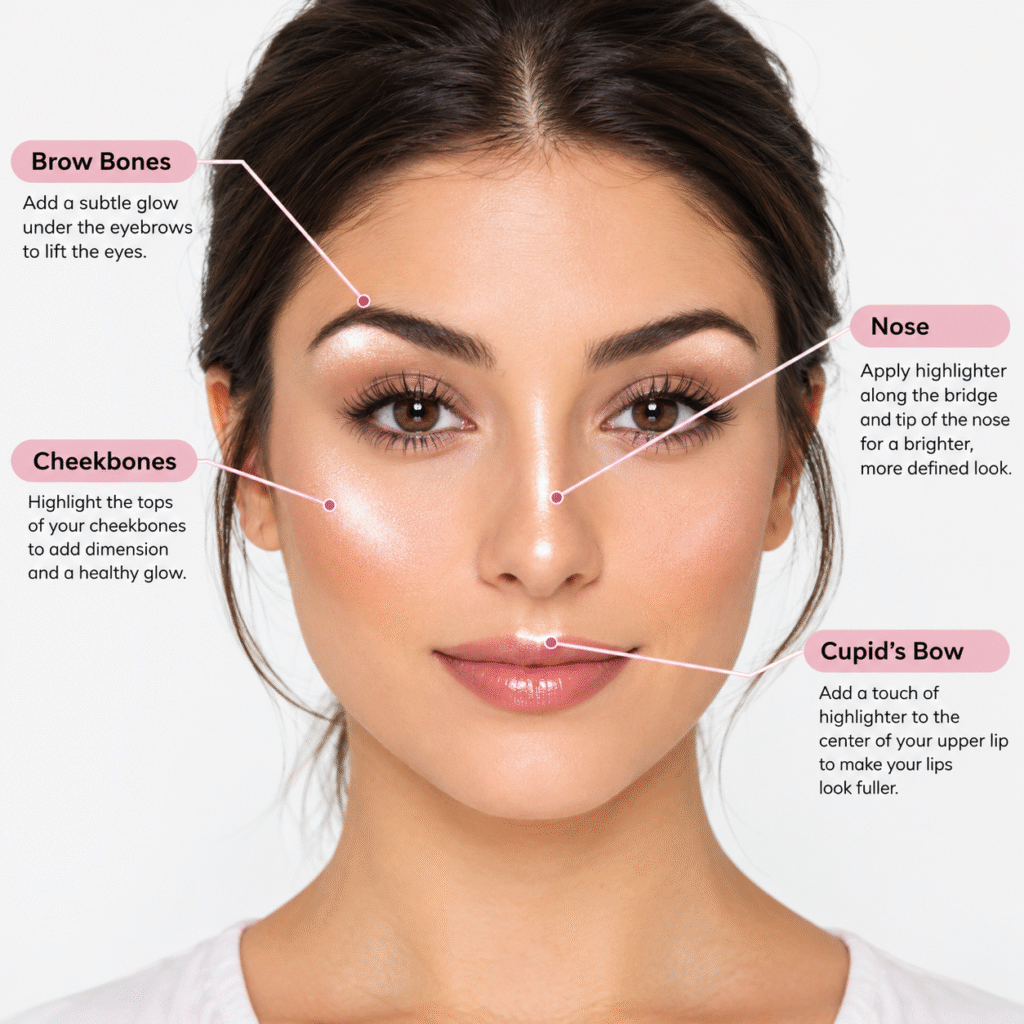
The best highlighter placement depends on your face shape, skin type, and the makeup look you want. However, some areas are popular because they naturally catch light.
You do not need to apply highlighter to every part of your face. Start with one or two areas, then add more if you like the result.
1. Cheekbones
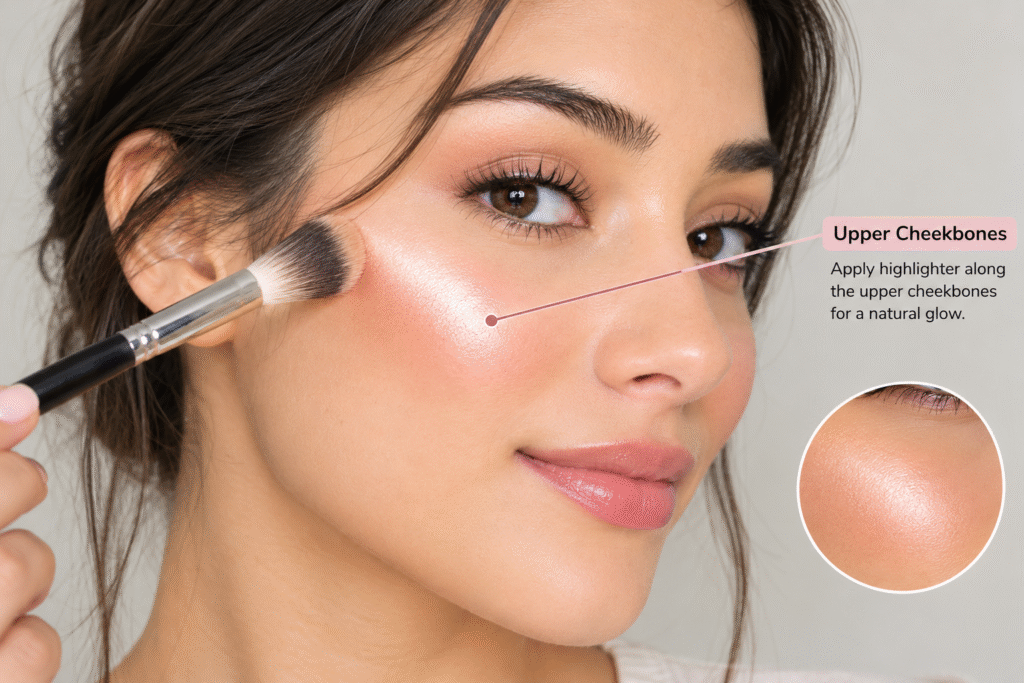
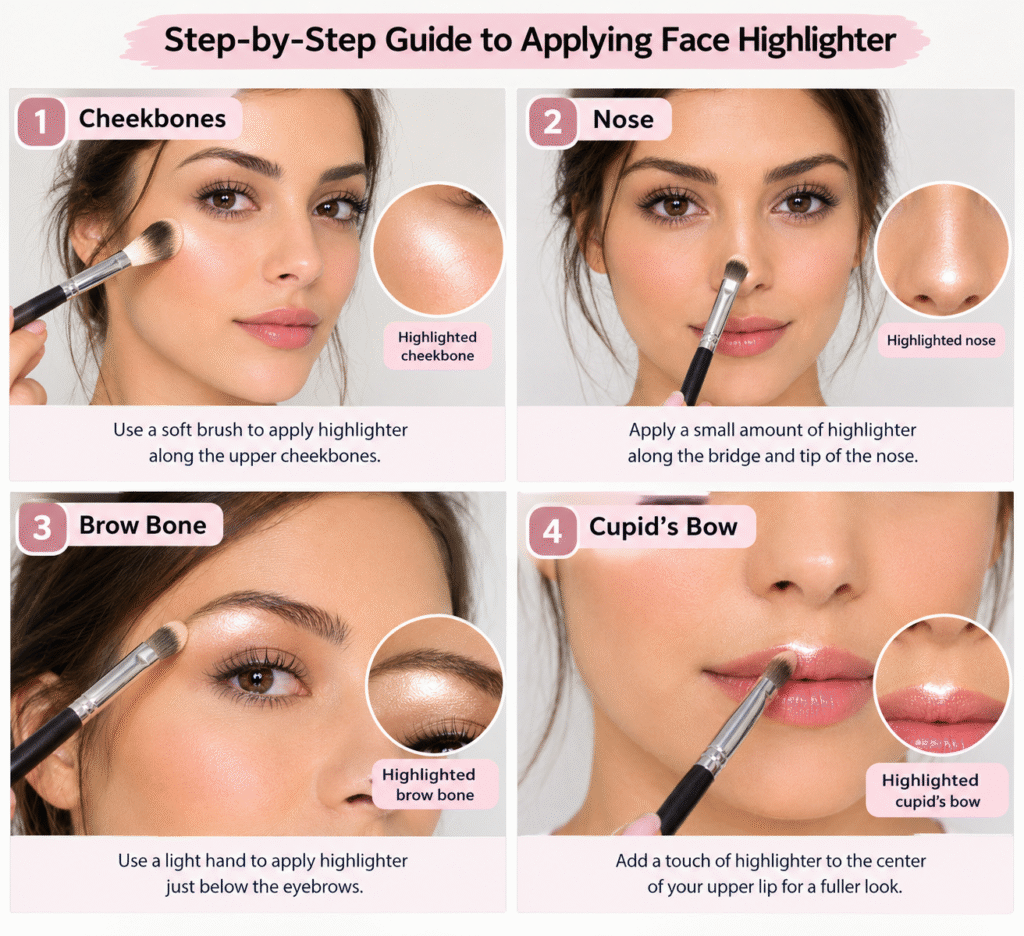
The cheekbones are one of the best places to put highlighter. Applying it here creates a lifted, fresh appearance and gives your cheeks a beautiful glow.
To find your cheekbones, gently touch the upper part of your cheeks. You can also smile lightly to see the shape of your cheeks. Apply a small amount of highlighter along the upper edge of each cheekbone, just above your blush.
Blend the product toward your temples using a soft brush, makeup sponge, or clean fingertips, depending on the formula. Keep the product on the upper cheek area rather than spreading it across the entire cheek.
For everyday makeup, choose a soft glow that looks natural in daylight. If you have oily skin or visible texture, use a small amount and avoid products with large glitter particles. A finely milled highlighter can give you shine without making the skin look overly sparkly.
2. Nose Bridge and Nose Tip
Highlighter can also make your nose look brighter by drawing attention to the areas that catch light.
For a subtle effect, apply a very thin line down the upper part of your nose bridge. Blend it gently so there are no sharp edges. If you want extra shine, you can add a tiny amount to the tip of your nose.
Be careful not to apply too much product. A thick, shiny line can look unnatural, especially in bright sunlight or photographs. A little highlighter is usually enough to create a fresh finish.
If you have oily skin, your nose may already become shiny during the day. In that case, you can skip this area or use a small amount of a soft, non-glittery product. Your makeup should make you feel comfortable, not force you to follow every beauty trend.
3. Brow Bone
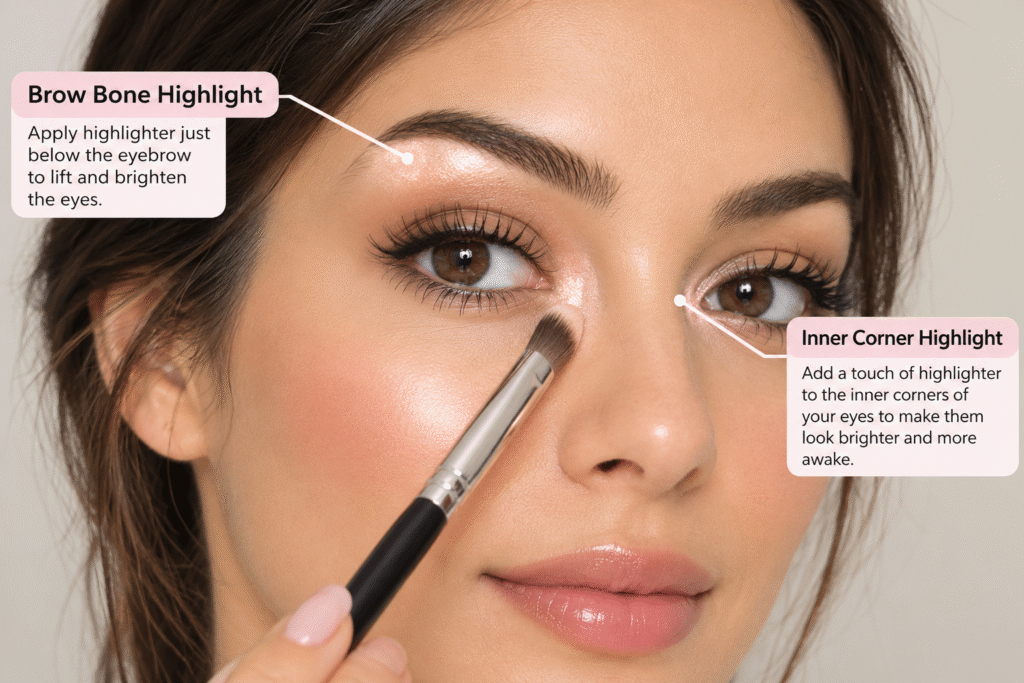
The brow bone is the area just below your eyebrow and above your eyelid crease. A small amount of highlighter here can make your eyes look brighter and help your eyebrows stand out.
Use a small brush or your fingertip to apply a little product beneath the outer part of your eyebrow. Blend it gently so it looks smooth and natural.
A champagne, soft gold, or light neutral shade can work well, depending on your skin tone and the rest of your makeup. Avoid creating a thick, bright stripe because it can make the makeup look heavy.
For a simple daily look, you can use the same highlighter on your cheekbones and brow bones. This helps your makeup look balanced without needing several different products.
4. Inner Corners of the Eyes
The inner corners are the small areas where your upper and lower eyelids meet, near your nose. Adding a tiny touch of highlighter here can make your eyes appear more awake and bright.
Use a small, clean brush to place a little product in each inner corner. Blend carefully, keeping the highlighter away from the eye itself.
This technique is especially useful when you want a fresh look without applying a lot of eyeshadow. It can also complement neutral eye makeup and make a simple makeup style look more polished.
If you have sensitive eyes, choose a product suitable for use around the eyes and avoid applying loose powder where it could enter your eyes. Always follow the product’s instructions.
5. Cupid’s Bow
The Cupid’s bow is the small curved area in the center of your upper lip. Its shape resembles the top of a heart.
Applying a tiny amount of highlighter just above this area can make your lips look more defined. It works especially well when you wear lipstick, lip gloss, or lip liner.
Use your fingertip or a small brush to apply a little product, then blend the edges. Avoid spreading highlighter too far across the skin above your lip, as this can make the area look overly shiny.
For a natural makeup look, choose a fine-shimmer product rather than chunky glitter. If you already have glossy lips, you may not need highlighter here at all.
6. Center of the Forehead and Chin
Some people apply highlighter to the center of the forehead and the tip of the chin to create an even glow. These areas can help balance the brightness across the face when used carefully.
However, these placements are optional. If your forehead and chin become oily during the day, adding shimmer to these areas may make the skin look greasier than you want.
If you decide to try this technique, use a very small amount and blend it well. Avoid applying highlighter over areas with noticeable bumps or texture if you prefer a smoother appearance.
The best makeup technique is the one that suits your face. You do not have to highlight every area just because a tutorial recommends it.
How to Choose the Right Highlighter for Your Skin
Choosing the right shade and formula can make your highlighter look much more natural. A product that suits your skin tone and skin type will usually be easier to apply and blend.
For lighter skin tones, soft champagne, pearl, and pale pink shades may look beautiful. For medium skin tones, champagne, peachy gold, and warm rose shades can work well. For deeper skin tones, rich gold, bronze, copper, and warm berry tones may create a lovely glow.
These are starting points, not strict rules. You can wear any shade you enjoy, so test the color in natural light before buying it if possible.
Skin type also matters. People with dry skin often enjoy cream or liquid highlighters because they can create a fresh-looking finish. People with oily skin may prefer powder formulas because they can be easier to control over makeup.
Powder, Liquid, and Cream Highlighters
There are three common types of face highlighters, and each offers a different finish.
| Highlighter type | Best for | How to apply |
| Powder | Beginners and oily skin | Use a soft brush and apply lightly |
| Liquid | A dewy, glowing finish | Blend a small drop with fingers or a sponge |
| Cream | Dry or normal skin | Tap gently onto the skin with fingers or a sponge |
Powder highlighter is often the easiest choice for beginners because you can build the shine slowly. Liquid highlighter is useful when you want a more noticeable, fresh glow, but it can be harder to control if you use too much. Cream highlighter sits between these options and can be blended easily when applied in small amounts.
If you wear foundation, apply liquid or cream highlighter without rubbing too hard, as this can disturb the makeup underneath. Powder highlighter usually works well after foundation and concealer have been set, although the best order depends on your products.
How to Apply Highlighter Step by Step
You do not need a complicated routine to get a beautiful result. Follow these simple steps to apply highlighter without making your makeup look too shiny.
Step 1: Prepare your skin. Start with clean skin and apply your usual moisturizer. If you wear foundation, blend it evenly before adding highlighter.
Step 2: Choose your product. Pick a shade that complements your skin and a formula that feels comfortable to use. If you are a beginner, a soft powder highlighter is a simple place to start.
Step 3: Start with a small amount. Pick up a little product with a brush or fingertip. Tap away extra powder before applying it to your face.
Step 4: Apply it to the right areas. Begin with your cheekbones, as this is one of the easiest places to see the effect. Add a little to your nose bridge, brow bone, or Cupid’s bow if you want extra glow.
Step 5: Blend the edges. Use gentle movements to soften any visible lines. The highlighter should blend into your makeup instead of looking like a separate stripe.
Step 6: Check your makeup in natural light. Look at your face near a window if possible. This helps you see whether the glow looks balanced or whether you have applied too much.
Step 7: Add more only if needed. If you want a brighter finish, apply another thin layer. Building the product slowly is easier than trying to remove too much.
Common Highlighter Mistakes to Avoid
One common mistake is using too much highlighter at once. A heavy layer can create an intense metallic finish when you only wanted a natural glow. Begin with a small amount and build the color gradually.
Another mistake is choosing a shade that looks too different from your skin tone for the effect you want. A very pale or icy shade may look more obvious on deeper skin, while a very dark bronze shade may create an unwanted stripe on lighter skin. Testing the product and blending it well can help you find a flattering finish.
You should also avoid applying highlighter everywhere. The forehead, cheeks, nose, and chin do not all need to shine at the same time. Focus on the areas you want to emphasize and leave the rest of your makeup balanced.
Finally, do not ignore your skin texture. Shimmer can draw attention to pores, fine lines, and raised spots. If you prefer a smooth finish, choose a fine, soft-shimmer product and apply it only to areas where you like the glow.
Most importantly, remember that makeup is personal. You can follow these techniques, change them to suit your face, or skip any placement that does not feel right for you.
Frequently Asked Questions
1. Where do you put highlighter on the face?
The most popular places are the upper cheekbones, nose bridge, brow bones, inner corners of the eyes, and Cupid’s bow. You can also apply a small amount to the center of your forehead or chin if you like a brighter finish.
2. Do you apply highlighter before or after foundation?
In most makeup routines, highlighter is applied after foundation. Cream and liquid formulas are generally applied before setting powder, while powder highlighter is usually applied after foundation and concealer have been blended and set as needed.
3. Can beginners use highlighter?
Yes! Highlighter is easy to use once you understand where to apply it. Start with a small amount on your cheekbones and blend it well. You can experiment with other areas after you feel comfortable.
4. Can you wear highlighter without foundation?
Yes, absolutely. You can apply highlighter directly to clean, moisturized skin or over sunscreen once it has settled. Use a small amount for a fresh look, and make sure the product is compatible with your other skincare products.
5. Which highlighter is best for everyday makeup?
A soft, finely milled powder or a subtle cream highlighter can work well for everyday makeup. Choose a shade that complements your skin and gives you the level of shine you enjoy. A natural finish is usually easier to wear during the day than a very glittery one.
Conclusion
Knowing where to put highlighter on the face can make your makeup routine easier and help you create a beautiful, natural glow. The upper cheekbones are an excellent place to start, while the nose bridge, brow bones, inner corners of the eyes, and Cupid’s bow are optional areas you can explore.
Choose a formula that suits your skin, apply a small amount, and blend it carefully. You do not need to use every technique or buy expensive makeup to get a lovely result. With a little practice, you can discover the placement and finish that make you feel most confident.
The most important rule is simple: use highlighter to bring attention to the features you love, and enjoy experimenting with your own style.